

Polka Dotted Swiss Roll Recipe

Some weekends, I go a little kitchen crazy. When cooking and baking are your go-to methods for letting off steam, stressful weeks can result in a weekend that produces more cookies than a human (and her boyfriend and her dogs) can possibly handle. This swiss roll happened on one of those weekends.


I can't even tell you what had been so stressful, but in a single Sunday, I made this polka-dotted cake, some delicious grilled cheese sandwiches, homemade breakfast sausages, freezer-friendly breakfast sandwiches to have handy for the week ahead, veggie burgers from scratch and finally some spring risotto. I cooked for about nine hours straight and made two oh-I-forgot-one-more-thing trips to the grocery store.
Luckily, I have a food blog, so having too much food also means recipes and posts for weeks to come! This swiss roll cake was the first thing I'd made that weekend. I had been feeling inspired from all of The Great British Bake-Off episodes I'd been watching, particularly the swiss roll episode. I loved eating swiss rolls as a kid, but as I watched the TV show contestants, I realized that I'd only ever really had the Little Debbie version, never made one myself. Not that that's a bad thing. Little Debbie swiss rolls are delicious.


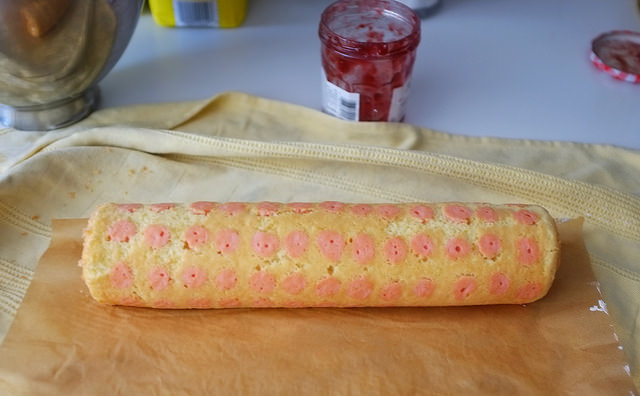
Anyway, I knew there were a few challenges when baking a swiss roll. I wanted to get a pretty pattern on the outside, and I also wanted to avoid the dreaded cracking-upon-rolling. The cake should have a circular spiral pattern when rolled up, not a square-ish one, with hard angles where breaks occur. After lots of research, I landed on the towel method as the most reliable for preventing breakage.
Here's what you need to know before embarking on a swiss roll of your own: a kitchen towel is your best friend. The key to getting a pretty roll is removing your cake swiftly from the pan and then rolling it up (with parchment paper on both sides) while it's still warm. Then, cover the roll with a clean kitchen towel. The towel will help to keep the cake from cooling too quickly and losing too much moisture—both of which can cause breakage. Yes, thinking about these things relaxes me. Who needs a foot massage when you have cakes to roll?

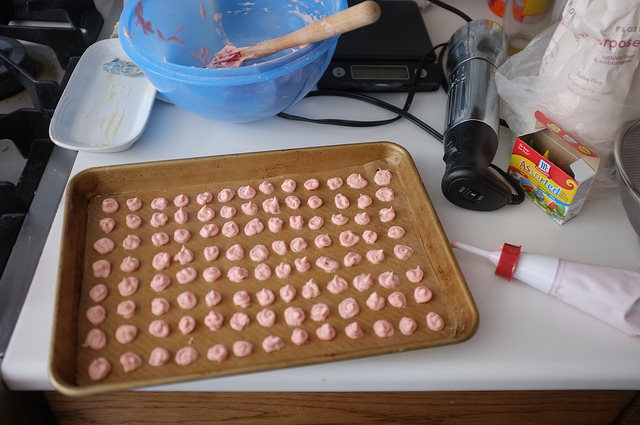
The second challenge was the decorative outside. If you walk into a Japanese bakery in New York City, you'll see the coolest-looking exteriors on swiss rolls. Multiple colors and patterns... sometimes full illustrations teasing about what you'll taste on the inside. I wasn't sure I could get that deep, so I went with a simple freehand polka dot pattern. It's pretty simple, really. Just create one batter that's slightly firmer and will hold its shape when the light, airy sponge batter is poured over the design. You can divide this thicker batter into a few jars and color with different food colorings to get more than one color in your pattern. Definitely something I'll try next time!
Here's the recipe. Note that it makes use of a kitchen scale, rather than cups/spoons measurements like you might be used to. It's way more fun and accurate to use the kitchen scale when baking though, so I definitely recommend trying it out if you can get your hands on a scale!

Recipe was adapted slightly from this one by Paul Hollywood.
Polka Dotted Berry Swiss Roll
For the Decorative Paste- 70 grams unsalted butter
- 70 grams powdered sugar
- 2 egg whites
- 80 grams all purpose flour
- a few drops red food coloring
- 3 large eggs (at room temperature)
- 70 grams sugar
- 70 grams all-purpose flour
- 200 grams raspberry jam
- 200 grams heavy whipping cream
- 30 grams sugar
Cooking Directions
- Preheat the oven to 350 degrees. Grease and line a Swiss roll tin with baking parchment paper.
- For the decorative sponge paste, cream the butter and icing sugar together until light and fluffy and then gradually add the egg whites, beating continuously. Fold in 80 grams flour then add the food coloring and beat until the mixture is a lovely pink. Spoon into a piping bag fitted with a plain piping nozzle and pipe 1-inch dots, spaced about 1 inch apart, across the tin. Refrigerate the tin while you make the plain cake batter.
- For the sponge, put the 3 eggs and 70 grams sugar into a large bowl and whisk with a hand-held electric mixer until the mixture is light and frothy and leaves a trail when the whisk is removed. Sift the flour over the mixture and carefully fold in using a large metal spoon or rubber spatula.
- Gently pour the mixture into the tin, giving the tin a little shake so the mixture finds its own level; gently push the mixture into the corners if necessary. Bake for 10-12 minutes, or until the sponge is golden-brown and starting to shrink away from the sides of the tin.
- Lay two sheets of parchment paper (cut a little larger than the size of the tin) on a work surface and sprinkle one with sugar. As soon as the sponge is cooked, turn it out onto the sheet of sugared paper and carefully peel off the lining paper. Lay the other sheet of paper over the striped top and flip over, so that the polka dots are underneath. Gently, and using the paper to help you, roll the cake up tightly into the shape it will take in its final form. Once rolled, wrap in a clean kitchen towel and set aside to cool.
- For the filling, whisk the heavy cream and 30 grams sugar in a bowl until it's reached stiff peaks.
- Once cooled, discard the sugared paper, unroll the cake and lay out on a clean surface; discard the top layer of parchment. Spread an even layer of the buttercream over the sponge.
- Spread an even layer of jam over the whipped cream. Roll up the Swiss roll firmly starting at the scored end and using the paper to help you. Trim edges so that the sides are clean and reveal the lovely swirl!